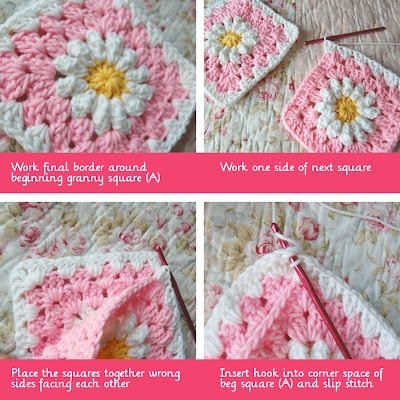
There are many different methods of joining granny squares - weaving, slip and single crochet, etc - but my favorite is to join as you go. Once again, my instructions may be slightly different than others you've seen, this is just how I do it and what works best for me!
Hopefully, I can relay this well, and it won't seem too confusing. Like anything, the more you do it, the easier it becomes.
If your squares are all different: arrange your completed squares how you would like them to appear, then create a pile for each row. I start from the top down, and stack from the righthand side on top. (Note: If all of your squares are the same: disregard these first two steps. Pile them up and work however many across.)
I hope that made sense. Keep connecting the squares in the row, and I'll post some more photos of how I work the connecting corners tomorrow! (To view part II, click here).


Thank you so much hun for this. I will try it out tomorrow. Totally appreciate it hun have a good one:)
ReplyDeleteThank you for the instructions ! Love the pink blanket !
ReplyDeleteYou're welcome - and thank you! I'll post up the corner joins as soon as I have some more time! Have a super weekend.
DeleteHi Laura,
DeleteTHANK YOU for sharing your crafts and talents!! I was so excited to find your daisey pattern. I've begun my first daisey afghan for one of my daughter in laws...who is WILD about Daisys. I have a stack of squares ready to begin joining. I am excited to learn the join as you go technique. However, I have a couple of questions.
I am following your part one tutorial. I have joined the first two squares as you show....completing the second square (b) with the joining round.
My question is this, do you only connect two squares at a time and then join two more? I feel as if I may be missing something.
Thank you!
Hi Lesa, Sorry for taking so long to get back to you. I was away. I connect my squares across first (or down - it doesn't really matter), but I do one row or column starting with one completed square, and then start each of the remaining squares with one side done, and then joining as noted above. When that row is complete, then you would start on the next row, by working one side and connecting from there. To complete a corner, using my technique, go to Part II under "Tutorials". I hope that helps. I'm trying to find the pattern I used for the "wedding" afghan I did, I think it's a Catherine's Wheel pattern. I'll let you know when I can locate it!
DeleteDo you do YouTube tutorials? As a beginner I find it easier to understand when watching how its done :)
ReplyDelete