Showing posts with label photo tutorial. Show all posts

Thursday, July 26, 2012

My join-as-you-go (part I)

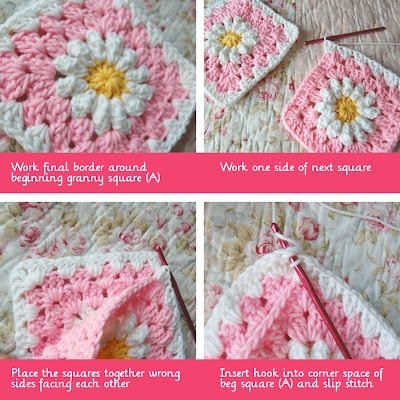
Thank you so much for all of the lovely comments on my last post! I'm waiting to hear back about how Lynette would like the edge to be done. For most blankets, I've been using a round of sc and then a round of dc for a simple border or a scalloped edge for a little something sweet. As promised, below is how I put all of those squares together.

There are many different methods of joining granny squares - weaving, slip and single crochet, etc - but my favorite is to join as you go. Once again, my instructions may be slightly different than others you've seen, this is just how I do it and what works best for me!

Hopefully, I can relay this well, and it won't seem too confusing. Like anything, the more you do it, the easier it becomes.

If your squares are all different: arrange your completed squares how you would like them to appear, then create a pile for each row. I start from the top down, and stack from the righthand side on top. (Note: If all of your squares are the same: disregard these first two steps. Pile them up and work however many across.)


I hope that made sense. Keep connecting the squares in the row, and I'll post some more photos of how I work the connecting corners tomorrow! (To view part II, click here).

Note: If you would like to sell items you have made with my patterns, please do give credit to Tillie Tulip. Thank you.


Saturday, June 9, 2012

Photo tutorial of how to create the daisy

To beg - chain (ch) 5 and join to form a circle

Round 1: ch 2, 11 double crochet (dc) into ring


Round 2: change to new color with a slip st in any space between dc; ch2, * 3 treble (tc) in same space; remove crochet hook and insert it into the top of the first tc; hook and pull last tc through first loop - petal made - ch2 * and repeat * to *. make 11 more petals in this fashion

Slip st into first petal and finish off.


Sorry I didn't include the steps and photos side-by-side, but I thought by including some photos, you could at least have a gauge for how it should look! Good luck!

You can see photos of my finished blanket here.

To see how to add rounds go here.