Showing posts with label granny square. Show all posts

Sunday, March 28, 2021

March Minty Granny Square Blanket Set


A co-worker asked me to make a baby gift for her nephew who was having a baby. She asked for grey and minty green colors. I worked up a simple granny square blanket and used the join-as-you-go method for this soft and sweet baby blanket.


I used Caron One Pound Soft Grey Mix and Pale Green; and Red Heart's Soft White. I did 6 squares across by 8 squares down, and added a simple hdc, shell edging followed by a round of the green in hdc. The blanket measures 30"x40".


I added a simple stockinette stitch hat. A FREE pattern is available at the Yarnspirations website here. I went with the newborn size.


I hope you are enjoying your Sunday.


Friday, February 19, 2021

Completed Postage Stamp Baby Blankets

I wanted to share some photos of a couple of completed blankets. I finished them with a round of hdc (half double crochet). In the next round, I evenly spaced 3 dc (double crochet) -- 6 dc, ch1, 6 dc in each corner. I repeated the shell pattern around with various colors, then finished with another round of hdc. I was going for a fun, random, colorful way to tie everything together, while using leftovers as much as possible. 

It's interesting how a border and edging can change the look of a blanket. It's always helpful to see how different options look before you commit to one yourself. I hope these are helpful to you.

From the leftovers of my uncle's blanket:


I had so much fun with the little squares, that I did one with leftover blues, browns, and neutral colors:


The finished size came out to 34" x 40" (10 squares across by 14 squares down). Each individual square is about 3"x3". I just realized that's 140 squares in each blanket. It sounds like a lot, but when you're in the thick of it, it seems to sail by. The weaving in is a bit of a drag, but I think it's worth it for this waffle-y (new word) effect. 

On a side note, when I stacked them together, I thought they would make a really cute gift for twins. Anyway, I'll be listing these at my Etsy shop in the very near future. Happy Friday and bon weekend!

Wednesday, January 13, 2021

Postage Stamp Baby Blanket


I used the leftovers from my uncle's blanket and worked up little, 2-round, granny squares, and the join-as-you-go method.

To see if my lengths of yarn are long enough, I use the finger tip to elbow measuring method :) I hold the yarn between my thumb and index finger, pull it to my elbow and repeat 11 more times. This typically ensures I have enough yarn to complete two rounds of a granny square.

Somehow my first post was overwritten. I like to think it was the blog site, but it was my own user error. I have been away from this site for too long, and it shows!


Monday, December 28, 2020

Special Christmas Gift


My uncle - who has always been a healthy and active person - has been struggling with a whole mess of health problems these past several years stemming from an infection he got after a surgery. His lungs have been deteriorating to the point he needed a lung transplant. Thankfully (after months of testing) he was approved and shortly thereafter received a new lung. 

On his 5 month anniversary of receiving the lung, he went on a 5 mile hike! I'm sure it hasn't been easy, but he makes it look that way. He's such a strong person, and I'm so happy he is finally feeling as good as he does.

For Christmas, I wanted to make him a blanket. Since I can't give him a big hug because of COVID-19, I'll let my blanket do the hugging :)

I had lots of blues and greens in my stash, and since he and my aunt are so outdoorsy, I went with those in a random granny square pattern. The colors reminded me of the sea, sky and nature in general. I just kept mixing the colors until I had enough squares (great stash buster too).  I think it came out quite nice.

Hope everyone is having a happy holiday season. 2021 can't get here fast enough!


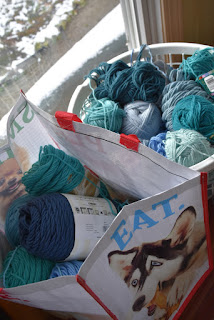
This was my chaos. It was controlled chaos, but I'm sure this would make some crazy :) Reusable shopping bags and laundry baskets make great holders while you are working on a project. My current work in progress is a baby blanket with the scraps. Stop back to see how that turns out.


Monday, February 4, 2019

Scrappy Pink Gradient Blanket

I used some leftover skeins of various brands some new, some old, some discontinued to get this gently flowing pink granny afghan. Still working on the border, but thought I would post a couple of inspirational photos to use up yarn bits and never feel you can't mix brands.

I did 4 squares x 6 squares for this baby blanket. Each block with white border is 7"x7".

Happy Monday :)


Thursday, February 8, 2018

Pop of Pink Granny Cowl

As I mentioned several months ago (OK, maybe last year) on Instagram, I finally have a granny cowl pattern to share with everyone. I've only worked it through in my head, so the written pattern hasn't been tested, but hopefully it is error-free. If not, please let me know, and I will revise when I can...it has been a busy 2018 already...work, kids, life. 

I hope you enjoy it. I use mine every day in these winter months. After many washes, it has loosened quite a bit, but I like the look and coverage still. The pink one I just finished for my daughter :) She is a skier and it fits snugly over her face from neck to nose.


You can download the pattern here.


Finished size: 18” circumference
(one size fits most)

Materials: (Any worsted weight yarn)
Universal Classic Worsted Yarn
(80% Acrylic, 20% Wool) 3.5 oz
Red Heart with Wool
(80% Acrylic, 20% Wool) 3.5 oz

A - 1 skein pink (light) (Universal)
B - 1 skeins gumball (medium) (RH)
C - 1 skeins pixie (dark) (RH)
D - 1 skein aran or white (Universal)

Crochet Hook - Size I - 9mm
Large Eye Blunt/Tapestry Needle

Abbreviations: 
sl st slip stitch 
ch chain 
sc single crochet 
hdc half double crochet 
dc double crochet 
tr triple crochet 
dtr double triple crochet 
sk skip 
st(s) stitch(es) 
sp(s) space(es) 
beg beginning


Directions: 
Granny square 1 (make 2)
With A, ch 4; join with sl st in first ch to form a ring. 
Rnd 1: Ch 3 [counts as first dc here and throughout], 2dc into ring, ch 2, (3dc in ring, ch 2) 2 more times; join with sl st in top of beg ch. Slip across remaining stitches to corner space.
Rnd 2: Join B in any corner space. Ch 3, (2dc, ch 2, 3dc) in same ch 2 sp (corner made),  (3dc, ch 2, 3dc) in next ch 2 sp; rep 2 more times; join with sl st into top of beg ch 3. Slip across remaining stitches to corner space.
Rnd 3: Join C in any corner space. Ch 3, (2dc, ch 2, 3dc) in same space (corner made), *3dc in next space, (3dc, ch2, 3dc)*. Repeat *to* 2 more times, 3dc, sl st into top of beginning ch 3. Slip across remaining stitches to corner space.
Note: If you are whip stitching add one more round with D. If you are joining-as-you-go, continue on to granny square 2.
Granny square 2 (make 2)
With C, ch 4; join with sl st in first ch to form a ring. 
Rnd 1: Ch 3 [counts as first dc here and throughout], 2dc into ring, ch 2, (3dc in ring, ch 2) 2 more times; join with sl st in top of beg ch. Slip across remaining stitches to corner space.
Rnd 2: Join B in any corner space. Ch 3, (2dc, ch 2, 3dc) in same ch 2 sp (corner made),  (3dc, ch 2, 3dc) in next ch 2 sp; rep 2 more times; join with sl st into top of beg ch 3. Slip across remaining stitches to corner space.
Rnd 3: Join A in any corner space. Ch 3, (2dc, ch 2, 3dc) in same space (corner made), *3dc in next space, (3dc, ch2, 3dc)*. Repeat *to* 2 more times, 3dc, sl st into top of beginning ch 3. Slip across remaining stitches to corner space.

Join-as-you-go
Alternate granny squares 1 and 2 as you use the join-as-yo- go method.
Tip: If you are using the join-as-you-go method, only do a half corner (ch3, 2dc) at the beginning of your last joining square. You will be joining this last square to the first three, but on the opposite side you will be joining it to your first square in the same round.


Finishing: 
Rnd 4 Continue with D (or join if you whip stitched) and ch 2, hdc in same stitch and in every st around. Join with a sl st to top of beg ch. Cut yarn. Repeat this round on the opposite side.
Rnd 5 Join B and ch 2, hdc in same stitch and in every st around. Join with a sl st to top of beg ch. Cut yarn. Repeat this round on the opposite side.
Rnd 6 Join C and ch 2, hdc in same stitch and in every st around. Join with a sl st to top of beg ch. Cut yarn. Repeat this round on the opposite side.
Weave in all ends.


Tuesday, February 14, 2017

Radiant Roses Blanket Complete!


I used approximately 1 skein of each color: Red Heart Super Saver (white, pretty in pink, petal pink, and glow worm). For this baby sized blanket, I did 4 squares x 4 squares. With the green border, the size was around 34" x 34".

I will try to put up a finished square pattern soon...the rose only pattern can be found here.


Tuesday, November 15, 2016

New custom order

I have been busy with work and a new custom order for a mom-to-be. She asked me to work up a granny square blanket using her bedding as inspiration. The bedding is a pretty pattern from Pottery Barn. I found a new pink yarn that I love and works really well. It's called Blush Pink from Big Twist Yarns. It is one of the prettiest pastel pinks out there.

The blanket is coming along. I still have to work on the edging.


Wednesday, October 12, 2016

Back again after a long break.


So many things have happened in the last year. My mother found out she had breast cancer, went through chemo, radiation, a lumpectomy, and beat it. Thank you Lord and my Mom for being such a trooper. One of the new items on my "to do" list is to make some hats for other women going through chemo. I'll try to post some photos when I can come up with some nice hats.

I have also been busy making some baby quilts and of course crocheting blankets like crazy. I did a lot of crocheting in waiting rooms during my Mom's appointments, and of course while sitting next to her in the chemo chair. For some reason, we were always the last ones to leave. I am grateful that she is now cancer free, and we hope to keep her that way!

Tomorrow I hope to send off the latest set to a lovely return customer who has requested a baby blanket in blues and grays with booties and a hat to match. I decided to knit the hat, because sometimes I just prefer a knitted hat. I like the tight stitches and "stretchy-ness" of a stockinette stitch.


Thursday, January 21, 2016

Daisies in the middle

A simple, sweet, square variation of the daisy blanket with a special edge.


I used Berroco Vintage Chunky yarns (Snow Day, Aquae, Minty, and Banana). The blanket is on the smaller side measuring 30"x 30". It's perfect for a car seat or tummy time. The yarn is so soft and warm. It was fun to use.

The border is a shell spaced picot edge.

Thursday, December 17, 2015

Finally finished - Daisies on the Edge

It took me longer than expected (between, kids, work and holiday things) to get this completed, but it's done. A new daisy blanket, I have dubbed "Daisies on the Edge". It's the same blanket I did back in 2012, but I used new yarn and new colors (Universal Classic Worsted Yarn). I also wrote the pattern, and it is available here. The main color is called bubblegum, but it reminds me more of a shrimp :)


Thank goodness it's almost Friday...

Friday, January 31, 2014

Coming along

Here's a photo update of the pretty aqua blanket. It's oh so sunny!


As I mentioned in my first post, This one is going to be a coverlet for a double sized bed, so I have a little ways to go, but I just love these colors together. Again, I am using: Lion Brand Gold Fish and Sweet Pea, Red Heart's Cornmeal and a discontinued Robin's Egg, as well as Bernat Aqua. I'm using the join-as-you-go method to put them all together.


Wednesday, January 22, 2014

Back on my aqua kick.


I just love aquas, greens and blues, and I love to pair them with a clean white. A few weeks ago I started a yarn purge. I've been trying to slowly get rid of some yarns that I just don't see myself using anytime soon. In the process, I came across these beautiful colors that made my fingers itch to put together into some blankets. A few of them are vintage, like the bright greens. Those are both vintage wintuk yarns, so the downside is that I won't be able to reproduce these exactly the same. On the same token, the upside is I "won't be able to reproduce these exactly the same", so they are truly unique. I like things that are one-of-a-kind.

I finished the first granny rectangle, a couple of weeks ago, but haven't had the chance to post it to tillie tulip for sale. I was dragging my feet a bit, because I wanted to include a onesie with a little matching heart for the upcoming Valentine's Day. Why do hearts make things so cute?


I used Creme de la Creme cotton yarn in aqua jade for the center, and single crocheted the edge in aqua. You can find my heart pattern here


Saturday, August 3, 2013

Custom daisy blanket complete

I finally finished up the pretty custom order, so I thought I'd share a little happiness with you:


It really is a sunny square. It somehow makes my day brighter. I hope it makes yours brighter too.

Have a wonderful weekend!

Monday, February 18, 2013

Gifts for the twins

I've been racking my brains trying to come up with something special for my cousin's new twin girls. I came across a lovely sunburst pattern (seems very "floral-ly" too) over at Purple Chair Crochet. I think I've seen similar patterns out there, but she has some nice photo instruction as well.


I chose Lion Brand Baby's First cotton/acrylic blend in Twinkle Toes, Fairy Tale, Cotton Ball and Bean Stalk. I'm going to add more squares and perhaps do some granny border in predominantly light pink for one and the darker pink for the other to keep them similar, but not the same. Just like the twins (whose names are Sofia and Lauren - I always want to say "Sophia Loren" :)


I'll post some final photos when I get these done, so you can see how they turn out. Hope you're having a lovely President's Day!


Sunday, November 25, 2012

Scrappy purple patchwork

Happy belated Thanksgiving! I've been so busy these days finishing up some large orders for Christmas, I haven't had much time to spend on new designs or posts to this little blog. I did however get Tillie's costume done for Halloween as well as finish up some works-in-progress including this one:


I started it this past summer! I used mainly end-of-skeins that I pack into little Zip Lock bags I always keep handy (I also use baggies for my snipped tails to stuff projects!) These poor little purple squares were sitting around for too long.

Instead of using my usual go-to edgings - sc/dc or scalloped edge - I've decided to use one of the lovely edges from a new book I purchased: Around the Corner Crochet Borders. Once again, Edie Eckman does not disappoint! I'm so pleased. I've got plenty of border books, but not many that address the corners!

There were so many to choose from, but here's the one I picked.


Stay tuned to see how it turns out...


Tuesday, October 9, 2012

EtsyMom Color Challenge 2012

I was so excited about this color challenge, that I stayed up to post pictures of my finished blanket. It's a simple granny square pattern using colors from the palette I selected. I also added some other shades of the same colors to give it a little depth and interest. Then I finished it off with a sc of the vibrant blue and a picot edge of the medium blue. I don't expect to win anything, but it was a nice diversion, and the challenge helped inspire me to try new color combinations.


I didn't want to leave the girls out, so I did one in pink as well (this one is not part of the challenge). I thought it came out with a "woodland-y" feel to it. I'm picturing little fairies, mushroom houses and woodland animals.

This was a lot of fun.


I hope you have a wonderful rest of your week!

Friday, September 21, 2012

Nice change

I'm very happy to work up all of these daisy afghans (although I'm looking forward to getting back to some smaller, kiddie-sized blankets), but it's a nice change to come up with a simple granny pattern for an Etsy customer.

Her daughter requested green and purple, so I worked up alternating rows with multi squares in between. Here's how it came out.

(I used Caron One Pound pale green, lilac and white.)


She asked for a scalloped edge, which I think added a very pretty touch. I hope she likes it.


Have a wonderful weekend!

Sunday, September 2, 2012

A great book

Many people have asked about the pattern for the blanket below, and I just finished up a new one, so I thought I would dedicate a post to it. The pattern can be found in the book  "Beyond the Square: Crochet Motifs". 


It's a great book full of fun and unique squares and motifs. They also use amazing colors in the photos. The background of my square is slightly different as I used a simple granny square (3dc ch2 3 dc (corner) then 3dc in each space around). That's the only difference. I highly recommend the book. 

I took a few photos of the my latest, finished blanket. I also took a photo of the back in case anyone was interested in seeing what that looks like.


Have a relaxing Labor Day!

Thursday, July 26, 2012

My join-as-you-go (part I)

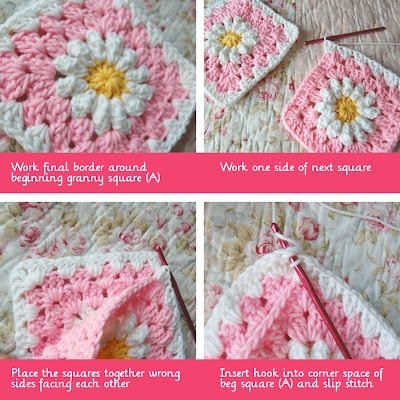
Thank you so much for all of the lovely comments on my last post! I'm waiting to hear back about how Lynette would like the edge to be done. For most blankets, I've been using a round of sc and then a round of dc for a simple border or a scalloped edge for a little something sweet. As promised, below is how I put all of those squares together.

There are many different methods of joining granny squares - weaving, slip and single crochet, etc - but my favorite is to join as you go. Once again, my instructions may be slightly different than others you've seen, this is just how I do it and what works best for me!

Hopefully, I can relay this well, and it won't seem too confusing. Like anything, the more you do it, the easier it becomes.

If your squares are all different: arrange your completed squares how you would like them to appear, then create a pile for each row. I start from the top down, and stack from the righthand side on top. (Note: If all of your squares are the same: disregard these first two steps. Pile them up and work however many across.)


I hope that made sense. Keep connecting the squares in the row, and I'll post some more photos of how I work the connecting corners tomorrow! (To view part II, click here).

Note: If you would like to sell items you have made with my patterns, please do give credit to Tillie Tulip. Thank you.